Friends! Family! Help me out! I have submitted 12 designs to the Minted
Design Challenge(partnered with Pottery Barn Kids and Pottery Barn
Teens). I would be most grateful if you could sign up and vote for your
favorite designs! Whoever has the most votes gets to have their designs
sold on Minted, as well as at Pottery Barn!!!! Thank you, and spread the
word!
You can use the Vote button on the side of the page! Thank you!!!
Friday, February 19, 2016
Tuesday, February 9, 2016
Watercolor Silhouette Tutorial: How to use masking fluid
Hello guys! Today I want to share with you how I used masking fluid to make some really cute Pokemon silhouette paintings for a friends nursery. This technique would work really well for a silhouette of anything, of course. I've noticed that these types of paintings and prints are a pretty hot item on Etsy and similar sites, too. So let's get started!

Supplies needed:
Computer and printer
Printer paper
Pencil
Masking tape/blue painters tape
Watercolor paper, I like this one
Watercolor paints, I use these, and these
Masking Fluid, I used this one
NOTE: I just linked to what I used, I'm not getting any compensation for any of these links.
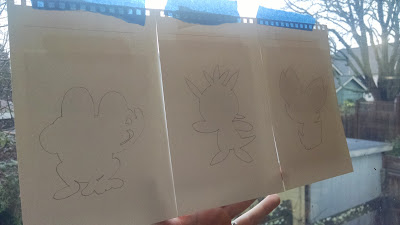
What I did first was do a search online for images of what I wanted to use for my silhouette. I saved the images I liked, then printed them out in grey-scale, in the size that I wanted for my paintings. Since I was doing three 5 by 7 paintings, I made each image fairly small, and all roughly the same size, about 3 1/2-4 inches square.
Once they were the size I wanted, I cut them out roughly, and taped them to the back of each piece of watercolor paper, centered where I wanted the image to be. Then I taped the whole thing up to my window so I could trace around the outside edge of the image. Try to do this as lightly as possible with a pencil. I wish I had done mine a bit more lightly. You want to be able to see it, but just enough. You can always lightly erase the pencil lines so they are not so dark.

Once that is done, you are going to take your masking fluid and paint a line of it around the outside of your pencil line. Make your line fairly thick, so it is easy to take off later. Try not to get any of the masking fluid on your pencil line! I learned this the hard way. Once the painting is dry and you peel off the masking fluid, if it was on your pencil line, the pencil line becomes permanent and you can't erase it!! Which is annoying!! So go around the pencil line without touching it, or make your pencil line super duper light so no one will notice it once the painting is complete. In the following example, I show you on a drawing of a heart.
VERY IMPORTANT: If you use a paint brush to paint your masking fluid on, use a crappy old paintbrush, because masking fluid will destroy your brush by eating away at the bristles. I have a nice small brush I use that was not cheap, but I hate it so it is perfect for masking fluid. :)>
Let the masking fluid dry, it will be a bit sticky-tacky but dry when it is time to paint. I used a wet-in-wet technique for these paintings. I used the main colors of each Pokemon, and tried to keep them nice and colorful and bright. You get the entire area you want to paint nice and wet, not puddles, just wet, then you dab your paint colors randomly. Once you are happy with it, let it dry completely. But don't forget about it for too long! Masking fluid should not sit all day on your paper. Let your painting dry, then peel the masking fluid off. It can discolor your paper if left on too long. I just used my finger to carefully rub it away, being careful not to touch the paint very much. The oils and sweat from your fingers can still smear dry watercolor paint sometimes, depending on what paint you used.
Once the masking fluid is off you can be done with your painting, or you can add some details. I chose to splatter some paint on the silhouettes to give it some more interest, and to kind of disguise some of my pencil lines that wouldn't erase. :(. But they turned out super adorable!
The paper I used is about 5 by 8, so I trimmed the paintings to and exact 5 by 7, and they were finished!
I am really happy with how masking fluid works, and I can't wait to play with it some more. And I might make some more of these kinds of silhouettes, too!

Supplies needed:
Computer and printer
Printer paper
Pencil
Masking tape/blue painters tape
Watercolor paper, I like this one
Watercolor paints, I use these, and these
Masking Fluid, I used this one
NOTE: I just linked to what I used, I'm not getting any compensation for any of these links.
What I did first was do a search online for images of what I wanted to use for my silhouette. I saved the images I liked, then printed them out in grey-scale, in the size that I wanted for my paintings. Since I was doing three 5 by 7 paintings, I made each image fairly small, and all roughly the same size, about 3 1/2-4 inches square.
 |
| Cute little helper |
Once they were the size I wanted, I cut them out roughly, and taped them to the back of each piece of watercolor paper, centered where I wanted the image to be. Then I taped the whole thing up to my window so I could trace around the outside edge of the image. Try to do this as lightly as possible with a pencil. I wish I had done mine a bit more lightly. You want to be able to see it, but just enough. You can always lightly erase the pencil lines so they are not so dark.


Once that is done, you are going to take your masking fluid and paint a line of it around the outside of your pencil line. Make your line fairly thick, so it is easy to take off later. Try not to get any of the masking fluid on your pencil line! I learned this the hard way. Once the painting is dry and you peel off the masking fluid, if it was on your pencil line, the pencil line becomes permanent and you can't erase it!! Which is annoying!! So go around the pencil line without touching it, or make your pencil line super duper light so no one will notice it once the painting is complete. In the following example, I show you on a drawing of a heart.
 | |
| Supplies: Paper, masking fluid, brush, eraser |
 |
| Thick layer of masking fluid |
 |
| Difference between thin layer/line and a thicker layer/line. Go for thicker! |
 |
| Nice thick layer/line of masking fluid |
VERY IMPORTANT: If you use a paint brush to paint your masking fluid on, use a crappy old paintbrush, because masking fluid will destroy your brush by eating away at the bristles. I have a nice small brush I use that was not cheap, but I hate it so it is perfect for masking fluid. :)>
 |
| My expensive crappy brush. The handle is soooo nice, but the bristles became all spread apart after using a few times. BOO |
Let the masking fluid dry, it will be a bit sticky-tacky but dry when it is time to paint. I used a wet-in-wet technique for these paintings. I used the main colors of each Pokemon, and tried to keep them nice and colorful and bright. You get the entire area you want to paint nice and wet, not puddles, just wet, then you dab your paint colors randomly. Once you are happy with it, let it dry completely. But don't forget about it for too long! Masking fluid should not sit all day on your paper. Let your painting dry, then peel the masking fluid off. It can discolor your paper if left on too long. I just used my finger to carefully rub it away, being careful not to touch the paint very much. The oils and sweat from your fingers can still smear dry watercolor paint sometimes, depending on what paint you used.
 | |
| Dry masking fluid |
 |
| Just peel/roll it off after your painting is dry. |
 |
| Can you see the pencil lines? Couldn't erase them since they had been under the masking fluid. |
 |
| Un-erasable pencil lines! :( |
 | |
| But we have a techniques to hide the lines!! |
Once the masking fluid is off you can be done with your painting, or you can add some details. I chose to splatter some paint on the silhouettes to give it some more interest, and to kind of disguise some of my pencil lines that wouldn't erase. :(. But they turned out super adorable!
 |
| All three, with their splatter detail |
 | |
| Close-up of splatter |
 | |
| I will trim them to the exact size and then they are ready to be framed! |
The paper I used is about 5 by 8, so I trimmed the paintings to and exact 5 by 7, and they were finished!
I am really happy with how masking fluid works, and I can't wait to play with it some more. And I might make some more of these kinds of silhouettes, too!
Thursday, February 4, 2016
Minted Contest; vote for my desgn!
Exciting news! A friend alerted me to an art contest(well, they call it a Design Challenge) on Minted, and I have entered a couple of pieces. I will be entering more pieces later today. I would so appreciate it if you would head over there to see my work, and to vote! The thing about this Minted contest is that they only sell the art that people voted for the most, so in order for me to get my art on there for sale, I need votes. And to top it off, this is a contest with Pottery Barn, so the winning artworks will be sold there!! OMG! So amazing! There are also cash prizes for different categories.
If you want to vote, there is a button on the side of the blog page, just click it to be taken to Minted. Voting doesn't start until after February 18th. I believe you have to sign up in order to vote. I will remind you guys! Thank you!
Or just try this link for the main Minted web site.
If you want to vote, there is a button on the side of the blog page, just click it to be taken to Minted. Voting doesn't start until after February 18th. I believe you have to sign up in order to vote. I will remind you guys! Thank you!
Or just try this link for the main Minted web site.
Tuesday, January 12, 2016
Sea Scape Paintings, and can I have some feedback, please?
Good morning friends!
I wanted to share with you some new Seascape paintings I finished, for a grand total of 5 in my little series so far. Not sure if I will add to it yet, since this past weekend I've had a Major Brain Wave on a new product to carry in the shop. More on that later!
So here they all are, in order that I painted them!
Seascape #1
 | |
| This one is on 8x8 super gorgeous textured paper |
Seascape #2
 | |
| This one is on 6x6 paper, a bit smoother type. More muted colors. |
Seascape #3
 | ||
| This is a bigger one, on 12x12 paper. |
Seascape #4
 | |
| Another small one, on 6x6 paper, I really like how the kelp/seaweed came out on this one. |
Seascape #5
 | |
| This is another one on 12x12 paper. This time I did a little snail. See him? |
Hope you like these! They would be very cute in a child's room, for some cute and colorful original art. I am going to get them listed in my shop today, so you can even have one of these original paintings for your very own! I will let you know when they are listed so you can check it out.
Now, as for my Major Brain Wave I mentioned earlier. Do you want the long version or the short version? Oh good, me too. Long version it is!
When I first started my Etsy shop (I'm using this term loosely, since I never actually made any product to sell...) I wanted to create personalized wall hangings, like mini quilts. Made for a child's room, with an appliqued picture and an applique of the child's name. I had just made a beautiful one for my youngest niece and I LOVED how it turned out. But...it was a lot of work! And fiddly, fussy work, which I kinda hate. So I said "never mind!" and never did anything with the shop.
Well, my Major Brain Wave over the weekend was to do this type of personalized wall art, but as a personalized watercolor painting! Duh! How cute would it be to have a painting of a little bird, boat, or flower, whatever, and have your new baby's name written on the painting, too? You could have their birth date, too, or just their name. This could be for an older child, too, of course. And how special and personal for a wedding or anniversary gift, to have the couple's names and maybe their wedding date? All original paintings, personalized with hand lettering. All bright, colorful images, which is what I like to paint.
I love this idea! So I am hoping for some feedback form my readers: What do you think? Good idea? Terrible? Let me know in the comments below!
Tuesday, January 5, 2016
My Studio
So I thought it would be fun to share what my studio looks like, if we can even call it a studio. No no, we ARE calling it my studio, because every artist has a studio. So, here is my studio!
A teeny little spot in our spare room to call my very own! I don't have to clean it up if I don't want to, so I can keep my momentum going. A work in progress for sure, though. I have some shelves I am going to put up on the wall, so the stuff hanging there now is going to be relocated. I need a place to keep all my supplies, finished artwork and cards, shipping supplies, etc. Right now it is kinda....everywhere.
And here is my inspiration/vision board. A few inspiring images from the interwebs, and a beautifully painted card from an artist friend of mine. And a play-dough charm, made by Thing 2. My goal for this year is to sell 30 items a month.
Here are a few more shots of my work space things...
And there you have it, folks! I love having my own little space to work, and leave things out to dry, or to keep them visible so I can work on them throughout the day during parenting breaks. Show me some love, and comment below what you think of my space, and I am certainly taking organization suggestions!
 | |
| Studio |
A teeny little spot in our spare room to call my very own! I don't have to clean it up if I don't want to, so I can keep my momentum going. A work in progress for sure, though. I have some shelves I am going to put up on the wall, so the stuff hanging there now is going to be relocated. I need a place to keep all my supplies, finished artwork and cards, shipping supplies, etc. Right now it is kinda....everywhere.
And here is my inspiration/vision board. A few inspiring images from the interwebs, and a beautifully painted card from an artist friend of mine. And a play-dough charm, made by Thing 2. My goal for this year is to sell 30 items a month.
 | |||||
| Vision/Inspiration Board |
Here are a few more shots of my work space things...
 |
| Paints, love these Daniel Smith watercolors. |
 |
| My palette, and some other paints. |
 |
| My brushes. I admit I bought these brushes because they were nice and because...they were green...... |
 |
| Mason jars for the win! And washi tape to decorate them. You can kinda see my purple "bone" folder, by my thumb. Love that thing! |
 | |
| A few paintings, some finished, some not. |
And there you have it, folks! I love having my own little space to work, and leave things out to dry, or to keep them visible so I can work on them throughout the day during parenting breaks. Show me some love, and comment below what you think of my space, and I am certainly taking organization suggestions!
Tuesday, December 29, 2015
What I've been painting lately
I think I've got a thing for ocean creatures. And sea plants. And other sea-dwelling beings. I started a kind of series of paintings recently, and they are undersea scenes. All similar, as of right now, which is nice, I think. I'm experimenting with layouts, and I haven't quite gotten my vision right yet. But the paintings are still cute! Check out my purple rock/blob things. Loving those, and can you see my tiny sand dollars? Enjoy!


Tuesday, December 22, 2015
My cards in a local shop!
I had some Christmas packages to mail last week, and there was NO WAY in heck I was going to the depressing and soul-sucking Ballard post office again. There are a couple of nice shops that double as mailing centers near me, so I went to one of those instead; the one that happens to be carrying some of my watercolor cards. I had my entourage of little girls with me, and before we left I told them to "look for mommy's/auntie's cards". So it was like an Easter egg hunt. This shop also has a tiny kid area, with toys and a little easel, so I was hoping it wouldn't be too boring if we had to wait a long time in line.
I needn't have worried about a line, I waited a total of about 25 seconds. And it took only that long for the girls to find my cards, too! The whole shop was full of their delighted squeals, the ladies working that day found it hilarious, thankfully.
As I was getting my packages weighed and stamped, I told the lady helping me that the kids were so excited about the crab and octopus because I was the artist who made the cards. Then it was even cuter to them because they were so excited.
The cards were displayed in two different places in the shop, and it looked like they had already sold about half of what they had ordered from me, which is great! Mostly the octopus card, there was only one of those left that I could see. And of course I took some sneaky photos; it felt weird to me to take photos, but I really wanted some!
So there you have it! I will be working harder on getting more of my cards in other shops in the Seattle area, Just waiting until after Christmas to do more sales calls. Not really the best time of year to do it, but I made a personal commitment to go every week, so I need to stick with it. Until next time guys!
I needn't have worried about a line, I waited a total of about 25 seconds. And it took only that long for the girls to find my cards, too! The whole shop was full of their delighted squeals, the ladies working that day found it hilarious, thankfully.
As I was getting my packages weighed and stamped, I told the lady helping me that the kids were so excited about the crab and octopus because I was the artist who made the cards. Then it was even cuter to them because they were so excited.
The cards were displayed in two different places in the shop, and it looked like they had already sold about half of what they had ordered from me, which is great! Mostly the octopus card, there was only one of those left that I could see. And of course I took some sneaky photos; it felt weird to me to take photos, but I really wanted some!
 |
| Card display in local shop |
 | |||
| Card display in the shop |
So there you have it! I will be working harder on getting more of my cards in other shops in the Seattle area, Just waiting until after Christmas to do more sales calls. Not really the best time of year to do it, but I made a personal commitment to go every week, so I need to stick with it. Until next time guys!
Subscribe to:
Comments (Atom)